Gel nails are not only great to look at, they also make the nails stronger that you can wear them for even up to two weeks. Many prefer to have them done in the salon. There are those who would rather skip the hassle of waiting for their turn to have their nails done by someone else, nevertheless. If you are one of those who would rather sit at the comfort of your home and have a mani or pedi whenever you want, but is at a lost on how to do gel nails, this guide is for you.
You will be surprised how easy it is to do and how amazing your nails will look. This easy to follow quick guide is perfect for both a pro and otherwise. So if you are just beginning to learn how to manage your nails, you can never go wrong with this DIY guide.
Keep your tools within reach and have your nail station ready. With constant and correct practice, you will have perfect nails whenever you want. This DIY is one thing that every woman needs to know.
This is how to do your DND gel polish colors properly:
1. Find a comfortable place to do your nails. Make sure you are in a well-lit and well-ventilated room but away from the windows where direct sunlight may pass through. The whole process may take up to about an hour for starters. As you become more acquainted with the process, you will find it easier to do next time.
Make sure that the space you will be working on is properly covered. Ensure that you have enough room to turn about and that no furniture and any unnecessary item/s near your workspace.
2. Prepare your nails. The polish will cling on to the nails if their surface were prepared properly for the treatment. If you have cuticles that are a bit hard to push, you may need to soak them in warm water first.
You will use a slanted manicure stick to gently push the cuticles to reveal longer-looking nails and the Lunula, the half-moon shaped area at the base of the nails. This will give you a clean surface that you can cover with your LDS dip nail polish later on.
3. Shape your nails. Using a nail file, shape your nails as you desire. There are different nail shapes that you may choose from (round, square, squoval, oval, stiletto, almond, lipstick, and ballerina). There is just a certain shape that will go well with the size and shape of your fingers, however. The best way to determine the best nail shape for you is to use what will complement your whole hand.
4. Buff your nails. After filing the edges of your nails, you will need to buff the surface of the nails. Make sure that you buff even the sides of the nails and around the nail cuticles. Buffing the whole surface will make it easier for the gel nail to cling on to the nails better and longer.
Once done with buffing, wash your hands with soap and water to remove the remaining dust on your nails. Wipe clean your nails with a gel nail cleanser, then allow the nails to dry for about 15 minutes.
5. Apply the gel primer. Once your nails are ready for coating, you need to apply the gel primer. You will need a full primer coverage depending on the overall health of and oil in your nails. Air dry for about 30 seconds.
6. Apply the base coat. The base coat works like a double-sided tape and makes the nails manicured with gel polish to last longer. The plasticizers in it make the nails flexible and the cellulose chemicals incorporated in it make the gel polish to stick well to it and the nails.
You won’t need to worry if the polish won’t be leveled the first time you swipe your nail with the nail polish brush. There are so many gel nail polish brands that are made to be self-leveling. This will give you an even finish with each application without the presence of any brush strokes.
You need to do all fingers, except the thumb, before placing all four fingers under the LED lamp to cure. All fingers will cure after 15 seconds.
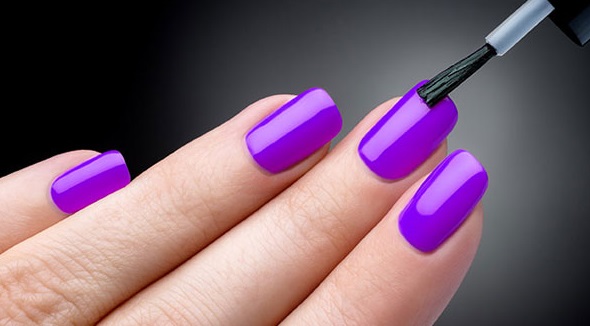
7. Apply the nail polish color. The number of color coating you will need will depend on how you would like your gel nail color to look on your nails. For quite a solid finish, you may need up to three coats of the same SNS nail colors. Once done, cure the nails (the four fingers first, then the two thumbs) for a full 30 seconds.
8. Apply the top coat. There are brands that have both the top and the base coat in one bottle. If you pick one in this formula, you will need to cover your nails with the same coat for the last time. Curing period for the top coat is 15 seconds.
Once done, just make sure that there is no polish over the edges of the cuticle. If you find traces of the polish on them, just tidy with the manicure stick and you are done.
 1. Make a point to wash your feet day by day. Your feet have a tendency to get sweatier and dirtier than different parts of the body, so it's essential to have great sanitary propensities.
Wash them with cleanser and warm water. This will purge your feet of sweat, dirt and microscopic organisms that could have made there their home. Give extra attention to the spaces in the middle of the toes. Wipe your feet delicately with a towel a short time later.
Keep your toenails spotless too. In the event that you stroll around wearing shoes in the late spring, you may find that your toenails get grimy. Set aside the opportunity to clean them each time you bathe your feet.
2. Saturate your feet daily Put moisturizer or foot cream on them as you do to your body every day. One approach to accomplish delicate, saturated feet is to rub on some jelly before bed, and wear socks. Regularly clean and moisturize the toenails. Use nail polish safely as
1. Make a point to wash your feet day by day. Your feet have a tendency to get sweatier and dirtier than different parts of the body, so it's essential to have great sanitary propensities.
Wash them with cleanser and warm water. This will purge your feet of sweat, dirt and microscopic organisms that could have made there their home. Give extra attention to the spaces in the middle of the toes. Wipe your feet delicately with a towel a short time later.
Keep your toenails spotless too. In the event that you stroll around wearing shoes in the late spring, you may find that your toenails get grimy. Set aside the opportunity to clean them each time you bathe your feet.
2. Saturate your feet daily Put moisturizer or foot cream on them as you do to your body every day. One approach to accomplish delicate, saturated feet is to rub on some jelly before bed, and wear socks. Regularly clean and moisturize the toenails. Use nail polish safely as